Let me just start this blog post by saying that writing to video with OpenCV can be a huge pain in the ass.
My intention with this tutorial is to help you get started writing videos to file with OpenCV 3, provide (and explain) some boilerplate code, and detail how I got video writing to work on my own system.
However, if you are trying to write videos to file with OpenCV in your own applications, be prepared to:
- Do research on the video codecs installed on your system.
- Play around with various codec + file extensions until the video writes to disk successfully.
- Make sure you’re in a secluded place away from children — there will be a lot of swearing and cursing.
You see, while the functions used to create video files with OpenCV such as cv2.VideoWriter
, cv2.VideoWriter_fourcc
, and cv2.cv.FOURCC
are quite well documented, what isn’t nearly as documented is the combination of codec + file extension required to successfully write the video file.
It’s been a long time since I needed to create an application to write videos to file with OpenCV, so when I sat down to compose the code for this blog post, I was very surprised (and super frustrated) with how long it took me to put together the example.
In fact, I was only able to get the code working with OpenCV 3! The code detailed in this post is not compatible with OpenCV 2.4.X (although I have highlighted the code changes required to run on OpenCV 2.4 if you want to give it a try).
Note: If you need help installing OpenCV on your system, please consult this page for a list of installation instructions for various platforms. Also be sure to take a look at the Quickstart Bundle and Hardcopy Bundle of Practical Python and OpenCV which include a downloadable Ubuntu VirtualBox virtual machine with Open 3 pre-configured and pre-installed.
Anyway, in the remainder of this post, I’ll demonstrate how to write video to file using OpenCV. And hopefully you’ll be able to use this code in your own applications without tearing out too much hair (I’m already so bald, so I don’t have that problem).
Looking for the source code to this post?
Jump Right To The Downloads SectionWriting to video with OpenCV
The purpose of this tutorial is to learn how to write frames to video using OpenCV and Python. We’ll discuss how to:
- Access a video stream, using either a builtin/USB webcam or the Raspberry Pi camera module.
- Read frames from the stream.
- Construct a new frame that visualizes the original image, plus the Red, Green, and Blue channel components individually.
- Write our newly constructed frame out to video file using OpenCV.
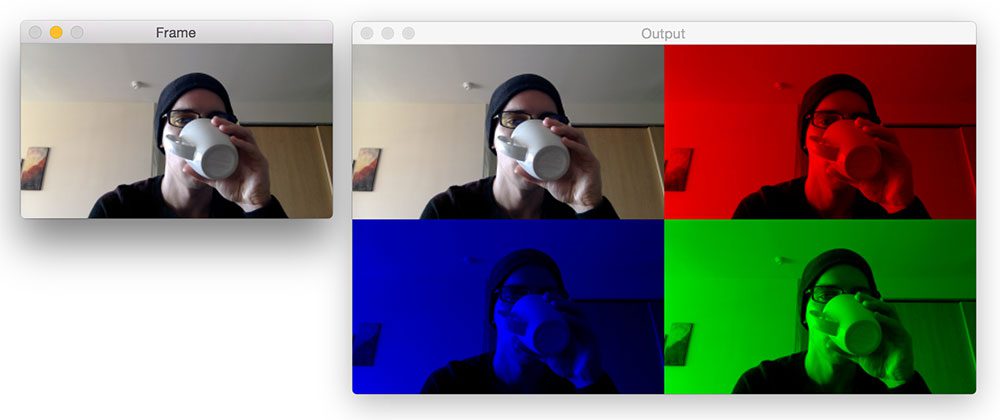
The results will look similar to the screenshot below:
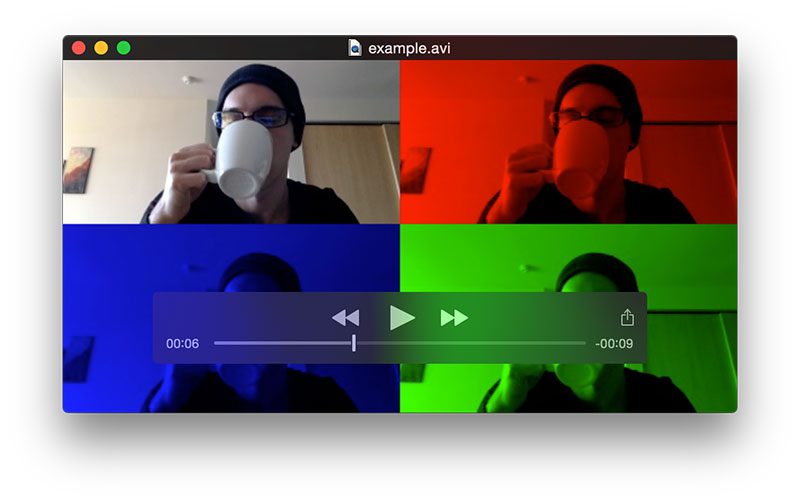
Here we can see the output video being played in QuickTime, with the original image in the top-left corner, the Red
channel visualization in the top-right, the Blue channel in the bottom-left, and finally the Green channel in the bottom-right corner.
Again, the code for this post is meant to be ran with OpenCV 3 or 4, so make sure you have the right version installed on your system before executing the code.
Creating our OpenCV video writer
Let’s go ahead and get started writing to video with OpenCV.
Open up a new file, name it write_to_video.py , and insert the following code:
# import the necessary packages from __future__ import print_function from imutils.video import VideoStream import numpy as np import argparse import imutils import time import cv2 # construct the argument parse and parse the arguments ap = argparse.ArgumentParser() ap.add_argument("-o", "--output", required=True, help="path to output video file") ap.add_argument("-p", "--picamera", type=int, default=-1, help="whether or not the Raspberry Pi camera should be used") ap.add_argument("-f", "--fps", type=int, default=20, help="FPS of output video") ap.add_argument("-c", "--codec", type=str, default="MJPG", help="codec of output video") args = vars(ap.parse_args())
We start off on Lines 2-8 by importing our required Python packages. We’ll be using the (highly efficient and threaded) VideoStream
class which gives us unified access to both builtin/USB webcams along with the Raspberry Pi camera module. The VideoStream
class is implemented inside the imutils Python package. You can read more about the VideoStream
class, how it can access multiple camera inputs, and efficiently read frames in a threaded manner in this tutorial.
Also, if you do not already have imutils
installed on your system, you’ll want to do that now:
$ pip install imutils
From there, we parse our command line arguments on Lines 11-20. Our write_to_video.py
script requires one command line argument, followed by three optional ones:
--output
: This is the path to where our output video file will be stored on disk.--picamera
: Here we can specify if we want to use the Raspberry Pi camera module instead of a builtin/USB camera. Supply a value > 0 at runtime to access the Pi camera module.--fps
: This switch controls the desired FPS of the output video. Ideally, the FPS of the output video should be similar to the FPS of your video processing pipeline.--codec
: Here we supply the FourCC, or four character code, an identifier for the video codec, compression format, and color/pixel format in video files.
As I mentioned at the top of this post, you’ll likely be spending a lot of time tweaking the --output
video file extension (e.x., .avi
, .mp4
, .mov
, etc.) and the --codec
value.
As the name suggests, the FourCC is always four characters. Popular examples include MJPG
, DIVX
, and H264
. You can see the entire list of possible FourCC codes here.
When I originally wrote the code for this blog post, I spent hours trying to figure out the right combination of both file extension and FourCC. I tried dozens of combinations, but none of them worked.
Furthermore, these combinations are also a bit temperamental. When I tried using a MJPG
codec with a .mp4
or .mpg
file extension, the video wouldn’t write to file. But when I used MJPG
with a .avi
file extension, the frames were magically written to video file.
Baffling, right?
My point here is that you’ll need to spend time playing around with these values. Depending on your setup and video codecs installed on your system, different combinations may work while others may not.
That said, I found the combination of MJPG
and .avi
worked on both my OSX machine and my Raspberry Pi out of the box, so if you’re having issues getting video to write to file, be sure to try these combinations first!
Let’s continue working through the write_to_video.py
script:
# initialize the video stream and allow the camera # sensor to warmup print("[INFO] warming up camera...") vs = VideoStream(usePiCamera=args["picamera"] > 0).start() time.sleep(2.0) # initialize the FourCC, video writer, dimensions of the frame, and # zeros array fourcc = cv2.VideoWriter_fourcc(*args["codec"]) writer = None (h, w) = (None, None) zeros = None
Here we initialize our VideoStream
and allow the camera sensor to warmup (Lines 25 and 26).
We then initialize our fourcc
codec using the cv2.VideoWriter_fourcc
function and the --codec
value supplied as a command line argument.
Note: For OpenCV 2.4.X, you’ll need to change cv2.VideoWriter_fourcc(*args["codec"])
function to cv2.cv.FOURCC(*args["codec"])
.
From there, initialize a few more variables, including our video writer, width and height of our frame, and finally a NumPy array that will be comprised entirely of zeros (more on this later).
Now comes the main loop of our script:
# loop over frames from the video stream while True: # grab the frame from the video stream and resize it to have a # maximum width of 300 pixels frame = vs.read() frame = imutils.resize(frame, width=300) # check if the writer is None if writer is None: # store the image dimensions, initialize the video writer, # and construct the zeros array (h, w) = frame.shape[:2] writer = cv2.VideoWriter(args["output"], fourcc, args["fps"], (w * 2, h * 2), True) zeros = np.zeros((h, w), dtype="uint8")
On line 36 we start looping over frames from our video stream, reading them, and then resizing them to have a width of 300 pixels (Lines 39 and 40).
We then make a check to see if the writer
is None
(Line 43), and if it is, we need to initialize it. First, we grab the spatial dimensions (i.e., width and height) of the frame (Line 46) followed by instantiating the cv2.VideoWriter
(Lines 47 and 48).
The cv2.VideoWriter
requires five parameters:
- The first parameter is the path to the output video file. In this case, we’ll supply the value of the
--output
switch, which is the path to where our video file will live on disk. - Secondly, we need to supply the
fourcc
codec. - The third argument to
cv2.VideoWriter
is the desired FPS of the output video file. - We then have the width and height of output video. It’s important that you set these values correctly, otherwise OpenCV will throw an error if you try to write a frame to file that has different dimensions than the ones supplied to
cv2.VideoWriter
. - Finally, the last parameter controls whether or not we are writing color frames to file. A value of
True
indicates that we are writing color frames. SupplyingFalse
indicates we are not writing color frames.
You’ll notice that I am using a width and height that are double that of the original frame — why is that?
The reason is because our output video frame will have two rows and two columns — storing a total of four “images”. We thus need double spatial dimensions of the original frame.
Finally, Line 49 constructs an array of zeros with the same shape as the original frame.
We are now ready to construct or output frame and write it to file:
# break the image into its RGB components, then construct the # RGB representation of each frame individually (B, G, R) = cv2.split(frame) R = cv2.merge([zeros, zeros, R]) G = cv2.merge([zeros, G, zeros]) B = cv2.merge([B, zeros, zeros]) # construct the final output frame, storing the original frame # at the top-left, the red channel in the top-right, the green # channel in the bottom-right, and the blue channel in the # bottom-left output = np.zeros((h * 2, w * 2, 3), dtype="uint8") output[0:h, 0:w] = frame output[0:h, w:w * 2] = R output[h:h * 2, w:w * 2] = G output[h:h * 2, 0:w] = B # write the output frame to file writer.write(output)
First, we split the frame into its Red, Green, and Blue components, respectively (Line 53). We then construct a representation of each channel using zeros
to fill in the appropriate dimensions (Lines 54-56).
We are now ready to create our output
video frame, where the dimensions will be exactly double the width and height of the resized frame (Line 62).
Lines 63-66 handle storing the original frame in the top-left corner of the output image, the Red channel in the top-right, the Green channel in the bottom-right, and finally the Blue frame in the bottom-left.
The output
frame is written to file using the write
method of the cv2.VideoWriter
.
Finally, our last code block handles displaying the output frames to our screen and performing a bit of cleanup:
# show the frames cv2.imshow("Frame", frame) cv2.imshow("Output", output) key = cv2.waitKey(1) & 0xFF # if the `q` key was pressed, break from the loop if key == ord("q"): break # do a bit of cleanup print("[INFO] cleaning up...") cv2.destroyAllWindows() vs.stop() writer.release()
Be sure to make note of Line 84 where we call the release
method of the writer
— this ensures that the output video file pointer is released.
Running our OpenCV video writer
To execute our OpenCV video writer using a builtin/USB webcam, use the following command:
$ python write_to_video.py --output example.avi
If you instead want to use the Raspberry Pi camera module, use this command:
$ python write_to_video.py --output example.avi --picamera 1
In either case, your output should look similar to my screenshot below:
Here you can see the original frame on the left, followed by the modified output frame that visualizes the RGB channels individually on the right.
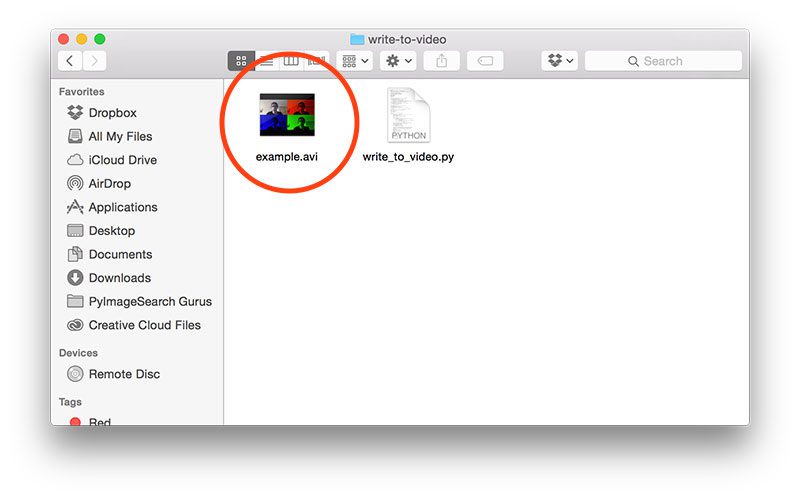
After pressing the q
key and terminating the Python script, we can see that example.avi
has been written to my disk:
I can then open up this file in QuickTime or VLC and view it:
A full video demonstration of the OpenCV video writer can be seen below:
Help! My video isn’t writing to file with OpenCV.
As I’ve mentioned multiple times earlier in this post, the main reason your video is not writing to file is likely the combination of video codec and file extension.
I found that by using a codec of MJPG
and file extension .avi
, I was able to successfully write to video using OpenCV on both my OSX machine and Raspberry Pi. I would suggest starting with these values and working from there.
But in all honesty, you will have to spend time banging your head against a wall to resolve this problem. You’ll need to try different combinations of FourCC and file extensions. Furthermore, OpenCV does not return any helpful error messages regarding this problem, so it’s pretty much a trial and error situation.
While I haven’t attempted this myself, I have heard that installing FFMPEG (and even re-compiling OpenCV with FFMPEG support) can help enable more video codecs.
Finally, if you find a combination of FourCC and file extension that works, be sure to post in the comments section, including the:
- FourCC that you used.
- File extension.
- Operating system.
- And any other relevant information.
This way we can compile a set of combinations that routinely work and (hopefully) avoid the troublesome situation of frames not being written to video file.
What's next? We recommend PyImageSearch University.
84 total classes • 114+ hours of on-demand code walkthrough videos • Last updated: February 2024
★★★★★ 4.84 (128 Ratings) • 16,000+ Students Enrolled
I strongly believe that if you had the right teacher you could master computer vision and deep learning.
Do you think learning computer vision and deep learning has to be time-consuming, overwhelming, and complicated? Or has to involve complex mathematics and equations? Or requires a degree in computer science?
That’s not the case.
All you need to master computer vision and deep learning is for someone to explain things to you in simple, intuitive terms. And that’s exactly what I do. My mission is to change education and how complex Artificial Intelligence topics are taught.
If you're serious about learning computer vision, your next stop should be PyImageSearch University, the most comprehensive computer vision, deep learning, and OpenCV course online today. Here you’ll learn how to successfully and confidently apply computer vision to your work, research, and projects. Join me in computer vision mastery.
Inside PyImageSearch University you'll find:
- ✓ 84 courses on essential computer vision, deep learning, and OpenCV topics
- ✓ 84 Certificates of Completion
- ✓ 114+ hours of on-demand video
- ✓ Brand new courses released regularly, ensuring you can keep up with state-of-the-art techniques
- ✓ Pre-configured Jupyter Notebooks in Google Colab
- ✓ Run all code examples in your web browser — works on Windows, macOS, and Linux (no dev environment configuration required!)
- ✓ Access to centralized code repos for all 536+ tutorials on PyImageSearch
- ✓ Easy one-click downloads for code, datasets, pre-trained models, etc.
- ✓ Access on mobile, laptop, desktop, etc.
Summary
In today’s blog post, we learned how to write frames to video using OpenCV and Python. Specifically, we used OpenCV 3 and the cv2.VideoWriter
method to handle writing frames to file.
The key to creating a working video writer is to determine the correct combination of (1) FourCC and (2) file extension.
Furthermore, you need to ensure you have the proper video codec installed on your system –otherwise, your frames will not be written to file (and OpenCV won’t provide you with any helpful error messages or warnings).
If you find a combination of FourCC and file extension that works for you, be sure to post in the comments section, detailing which FourCC you used, the video file extension that worked, your operating system, and other other relevant information on your setup. Ideally, we can create a list of FourCC and file extension combinations that routinely work for people.
In next week’s post, we’ll create a more practical application of video writing were we save key event video clips, allowing us to parse an entire video file and save only the most interesting clips.
Before you go, be sure to signup for the PyImageSearch Newsletter using the form below — you won’t want to miss the next post on key event video clips!
Download the Source Code and FREE 17-page Resource Guide
Enter your email address below to get a .zip of the code and a FREE 17-page Resource Guide on Computer Vision, OpenCV, and Deep Learning. Inside you'll find my hand-picked tutorials, books, courses, and libraries to help you master CV and DL!
Jon
Hey Adrian,
Thanks for the post. Writing video in OpenCV is indeed a pain in the ass. I’ve been using the codec pack provided on the fourcc web-site you mentioned under the XVID codec. I can’t remember which particular pack I downloaded (might of been FFDShow) but any one under the XVID option should do. In order to use the XVID codex I have to set the fourCC variable to:
fourCC = cv2.VideoWriter_fourcc(‘X’,’V’,’I’,’D’)
Which results in a lot smaller size with some image degradation. I would love to find a high quality compression codec that works but I have yet to.
Also, if you set the fourCC variable to -1 then it will prompt you with a dialog that shows you all of the codecs installed on your system. This helps to figure out what you’ve got installed so you can experiment. Another serious limitation of OpenCV’s video I/O capabilities is the ability to read in a video of a certain extension then intialize your Video Capture object with the appropriate codec so that you can then read the frames from that particular type of video extension. I have only been able to read video files with .avi extension in OpenCV.
Adrian Rosebrock
Hey Jon, thanks for the comment. I think the FourCC==-1 option was only for Windows? I didn’t think that worked on any other operating systems.
Arnie
Hey Adrian, I tried to write the “frame”. The output file was created however there’s nothing in the file. When I write the “output” it works properly tho. What could be the problem?
Adrian Rosebrock
Hi Arnie — are you using the code download associated with this blog post? Have you tried opening the output video in the VLC media player?
Daniel Ferguson
Did you change the height and width in the cv2.VideoWriter construction? I had the same thing because I forgot to change from (w * 2, h * 2) to (w, h).
Daniel Ferguson
I’m using Thonny on RPi3 with 2019-04-08-raspbian-stretch, and it printed for me in the Shell pane.
SteveW
I agree that this OpenCV video-writing is very frustrating, and should not be so difficult.
I have gotten the following to save video files correctly:
fourcc = cv2.VideoWriter_fourcc(*’mp4v’) with *.mp4 to work on both a Raspberry Pi 2 running Wheezy and an old Lenovo T61 running Ubuntu 15.10.
I have spent hours randomly experimenting with OpenCV3 video writing, and have concluded that I do not understand the underlying dependencies. For example, I could not get *.mp4 to work on the Ubuntu 14 LTS, possibly due to missing codecs in ffmpeg, so I switched to Ubuntu 15.10 and video writng works.
I have processed both a video stream from a Logitech C920 webcam and pre-recorded mp4’s showing H264, before writing to the video files.
I wish I knew a straightforward method to test which codecs and extensions might work on a given Linux install.
Adrian Rosebrock
Thanks for sharing Steve, myself and the rest of the PyImageSearch community thanks you 🙂
I also agree, I wish there was a straightforward method to test video extensions and codecs, but I don’t know of one. A really hack-y way to do it would be to loop over all possible codecs on the FourCC.org website along with common video file extensions and then determine if frames are being written to file.
Ryan
Hey Adrian, I think I got encoding of H.264 video to work on my pi following your openCV build tutorials. This is what I have in my conf.json file. My code is slightly different from your source.
“four_cc”: “cv2.VideoWriter_fourcc(‘H’,’2′,’6′,’4′)”,
“vid_out”: “output.mkv”,
The .mkv extension is what is needed for me to encode high res, low size video.
Also, thanks so much for this blog, it’s teaching me a ton of new stuff.
Adrian Rosebrock
Thanks for sharing! I’ll be sure to give this a try the next time I boot up my Pi.
Bill W
Thanks, Ryan. Works like a charm!
I also needed to bump gpu_mem from 128 to 144 to get past some ENOSPC errors on my Pi3/Camera2 setup.
David McDuffee
I haven’t made the jump to OpenCV 3 yet, but when I had a contract that called for reading and writing video, I ran into similar issues using OpenCV 2.
My own solution was to use ffmpeg to split the video into individual frames, use OpenCV on each frame, and use ffmpeg to re-encode the video. I still have a full head of hair.
Adrian Rosebrock
Thanks for sharing David. I’ve heard of using this as a hack to piece everything together. It certainly requires a bunch of extra steps, but as long as it works in the end, that’s all that matters 🙂
Esko
Hi Adrian,
Here are my test results in Windows 10. I recorded 640×480, 25 fps, 100 frames
Below are the results in the following order:
codec / file extension / file size / CodecID given by Mediainfo / Player that could open the file (WMP = Windows Media Player)
– / avi / 112512 kB / I420 / WMP, VLC, Films&TV, MovieMaker
MJPG / avi / 14115 kB / MJPG / VLC
MJPG / mp4 / 5111 kB / 6C / VLC
CVID / avi / 7459 kB / cvid / WMP, VLC, MovieMaker
MSVC / avi / 83082 kB / CRAM / WMP, VLC
X264 / avi / 187 kB / H264 / WMP, VLC, Films&TV, MovieMaker
XVID / avi / 601 kB / XVID / WMP, VLC, MovieMaker
XVID / mp4 / 587 kB / 20 / WMP, VLC, Films&TV, MovieMaker
Adrian Rosebrock
Thanks for sharing!
Chetan Chilhate
Thanks
You saved my lot of time
Laura
I am using windows 10 and openCV2 and the combination .avi and MSVC was able to open on windows media player! Thank you!
Godbid
It successfully worked on my RaspberryPi B+ with OpenCV3.
Thank you ! It’s very interesting !
Kirk H
This was extremely helpful Adrian
So far on my OSX 10.10.1 I have the following combinations working
*’mp4v’ -> .mp4
*’MJPG’ -> .avi
The challenge I am having is getting a smaller file format to work. I have an original video that is mp4, 14:09 long and 83.4 MB. The resulting file from the mp4v to mp4 is nearly 6 GB.
I’ve tried X264 to .avi, H264 to .avi, X264 to .mp4, H264 to .mp4, XVID to .avi
none of these combinations produce a readable file for either Quicktime or VLC.
Any thoughts on combinations to try?
Thanks
Adrian Rosebrock
Wow, 6GB is large. What is the resolution of the frames that you are writing to file?
Kirk H
I continued to experiment and am now using avc1
It has dropped the size by 25%. But that is still huge.
Here is how I define my output video
fourcc = cv2.VideoWriter_fourcc(*’avc1′)
cv2.VideoWriter(“output_video.mp4”,fourcc, 29.41, (1920, 1200),True)
I was hoping a format like X264 would give me a dramatic decrease in size, but I can’t figure out how to get X264 and H264 to work on my Mac.
Cesar W
Appreciate your combination Kirk H,
You combination has worked for me in Mac OS Mojave v10.14.4.
Will explore further…
Guowei
Thank you for your help.
I had FFMPEG compiled with OPENCV3. I was able to read files. But had trouble writing files after processing. Seems like imutils videostream did the trick for me.
Many thanks =]
Hilman
Adrian, I just have to stop by and say how awesome you are! Your code works out of the box with my Mac! Really thank you for this.
Keep up the good works helping others out!
Klaus
I cannot find any codec which saves the sound also.
fourcc=cv2.cv.CV_FOURCC(‘X’,’V’,’I’,’D’)
This one NOT.
Zac Diggum
Also working:
Saving uncompressed greyscale video:
fourcc: Y800 -> 8bit, VLC plays it, FFmpeg reencodes it
YV12 (12bit) and YV16 (16bit) seem to encode with OpenCV but won’t be played with VLC nor reencoded with FFmpeg.
Set isColor=False in the cv2.Videowriter() constructor.
If anyone has to do more serious video transcoding with Python I can recommend FFmpeg together with ffmpy.
Forgot to mention: video container is .avi
Adrian Rosebrock
Thanks for sharing Zac!
Peter Rexer
Anyone else get a IndexError: deque index out of range on line 38 of keyclipwriter?
I’m wondering what’s wrong in the code, or how the deque is initialized somehow wrong.
Any suggestions?
Ah, nevermind, I figured it out… at least one of the calls to put a frame into the buffer are needed before the .start method.
Klaus
Hello,
to write the video,
it does`nt work on my Ubuntu, but it worked on my Raspberry Pi.
But still one thing is true:
OpenCv and FFMPEG have the most problems of all big software!
Klaus
James
Thanks to Kirk’s comment I have OpenCV ver 2.4.13 and Python 2.7.5 working on Mac OSX10.9.5 with my Logitech webcam using ‘mp4v’ and filetype ‘.mp4’. The exact code is:
fourcc = cv2.cv.CV_FOURCC(‘m’, ‘p’, ‘4’, ‘v’)
out = cv2.VideoWriter(‘output.mp4’, fourcc, 7.3, (640,480))
Using Quicktime to record a short clip and then checking the framerate I was able to find the (very slow) framerate that my webcam was putting out.
Steven
Just wanted to let you know that almost a year later your comment ended my night of frustration with OpenCV. THANK YOU!
Carlos Torres
Adrian,
I have been following your progress (and purchased your first books) since your first draft. I am very happy with the book and with what you have done.
I have a question. and I cannot find any threads on a solution. I am using raspberry pi 3 B (mate 16.04) for continuous and multiple video clip recordings (say about hr videos over 24 hrs). I am using cv2 video writer and release (python 2.7) opencv 2.4.9 (from packages). I am running out of “ram”!. The problem seems to be the video writer. I release the video every time a clip is competed. (even tried deleting and re-initializing the variables). The problem is not there if I saw frames (imwrite) or if I simply stream (not a buffer full issue). I even put the video generation code into a function (instead of a script) and the problem (out of memory) is still there. The system monitor shows the memory is being swallowed and it’s never release (video). The memory (and I assume the video) is only released if I stop the code (esc or ctrl+c) or if the system kills it.
In summary. The videos are generated…but the video writers are not released which eats up all the memory and kills the process.
Do you know if this an opencv2.4.9 / python wrapper issue? Do you know any work arounds?
Thank you in advance and keep up the amazing site!
-Carlos
Adrian Rosebrock
Thanks for being a long-time follow of the PyImageSearch blog, Carlos!
As for the memory issue, that sounds like a memory leak of some kind. I personally haven’t ran into this issue before, but I would suggest posting it on the official OpenCV forums. Be sure to post your exact OpenCV and Python versions like you did here. If there is a known issue with the video writer and memory leakage, they’ll certainly be able to let you know.
Carlos Torres
Hi Adrian,
Just a quick update for those that might run into the same “memory” stupid issue. The issue seems to be the codec, but it could just be the way the video writer is implemented! Other codecs in 2.4.9 use less memory, but the non-video release remains. I just installed 3.1.0 from srcs (contrib-modules has a small, but annoying hdf5 issue – found a work around), opencv3.1.0 has a new codec definition method (removed cv), which really makes me think the issue was opencv2.4.9. Conclusion, 3.1.0 from srcs works. The video writer definition changes (as you pointed, from 2.4.x to 3.x). RAM consumption is no longer a problem. The videowriter is actually being released and new-frame updates instead of “accumulates”.
Adrian Rosebrock
Thanks for following up on this Carlos, I really appreciate it (as I’m sure other PyImageSearch readers do as well). I’ve made note of your comment and have included in my OpenCV notes that I refer to. I’ll absolutely keep this in mind the next time I’m using the VideoWriter. Thanks again!
Wang, Teng-Hong
cam = cv2.VideoCapture(0) # 0: build-in, 1: external
fourcc = cv2.VideoWriter_fourcc(‘M’,’J’,’P’,’G’)
vid = cv2.VideoWriter(‘output.avi’, fourcc, 6, (640,480))
After several try, I finally find this article.
my enviroment set as below.
OS: Windows 10 Home 64 bits
PL: Python 2.7.12
Lib: OpenCV 3.1
Player: VLC Player
MJPG&avi is very well combination.
I had tried XVID&avi / MJPG/mpg all get some trouble.
and M$ media player with Win7codecs can’t play the video.
So I turn to VLC Player.
Islam
Hi Adrian
I use this code to record 2 minutes video to file as the table below:
# fps CODEC ext. Duration actual duration@file Size (KB)
1 20 MJPG .avi 2 minutes -48 s 57,320
2 20 H264 .avi 2 minutes -43s 482
3 20 X264 .avi 2 minutes -42s 482
4 20 Mp4v .avi 2 minutes -41s 2,710
I find clip duration is less than two minutes (120 seconds) while the camera was taking 2 minutes real-time in recording. Could you help me how can be satisfied that results?
Adrian Rosebrock
It sounds like there is a mismatch between the FPS of your output file and your recording. Tweak the FPS parameter to
cv2.VideoWriter
to approximate the FPS of your actual recording.kapyar
What about python27 + openCV2.4 for my mac it works with next configuration:
fourcc = cv2.cv.CV_FOURCC(*”DIVX”)
self.out = cv2.VideoWriter(‘output.avi’,fourcc, int(25), (640,480))
rsc
On my OSX 10.11.6 (El Captain), the following settings worked for rcording video:
fps = 25
capSize = (int(cap.get(cv2.cv.CV_CAP_PROP_FRAME_WIDTH)), int(cap.get(cv2.cv.CV_CAP_PROP_FRAME_HEIGHT)))
fourcc = cv2.cv.CV_FOURCC(‘m’, ‘p’, ‘4’, ‘v’) # note the lower case
writer = cv2.VideoWriter()
success = writer.open(‘output.mov’,fourcc,fps,capSize,True)
Adrian Rosebrock
Thanks for sharing!
Jim
Hi Adrian, Wouldn’t it be simpler to use picamera to record video as in the code below? Or is it preferable to use OpenCV.
with picamera.PiCamera() as camera:
camera.resolution = (640, 480)
camera.start_recording(‘my_video.h264’)
camera.wait_recording(60)
camera.stop_recording()
Adrian Rosebrock
You can certainly use the
picamera
video to write frames to file, that’s not an issue at all. The problem is that you cannot access and process these frames prior to them being written to file.David
Hi Adrian,
Since some weeks, I have a problem to a video in a file.
I use exactly the same code than you, but when I read the file, I have only one frame to see. It’s as if the frames were not refreshed
The size of the file is correct, no error on the shell …..
Have you ever noticed an identical problem ?
Regards,
David
Adrian Rosebrock
Hey David — are you executing the code via a Python shell (i.e., IDLE) or via the command line? If you’re using IDLE the
cv2.imshow
call is likely hanging if there is not acv2.waitKey(1)
statement following it. For working with video files I recommend using the terminal and executing the actual script rather than utilizing IDLE.David
Hi Adrian,
I have seen this problem in my original soft. In this soft, video recording is in a thread.
So I decide to code a simply video recorder with no thread… But it is the same result, the video is just a loop of 1 frame.
It’s weird, a few months ago, it worked perfectly.
It is likely a raspicam driver update which is guilty or maybee the cam (I use the rapicam V2.1)….. I don’t know
I tested your solution, with or without Python shell, just 1 frame on the video file again ….
sinjon
Hello Adrian,
I seem to be getting a syntax error on the “None” in “if writer is None”
I’ve tried using = and == instead of ‘is’ as well as when writer is declared but no luck.
any ideas?
Thanks in advance
Adrian Rosebrock
Make sure you use the “Downloads” section of this tutorial to download the source code + project structure. It seems like you might have copied and pasted some code incorrectly.
sinjon
Sweet thank you.
One other error I’m getting in this code and some other is that break is outside loop. when I’ve replaced destroyAllWindows then I get an error on:
(h, w) = image.shape [:2]
NoneType object has no attribute ‘shape’
Adrian Rosebrock
It sounds like you’re having issues reading your image/frames from disk or video stream. Please see this blog post on NoneType errors for common problems and resolutions to the issue.
Sinjon
Thank you, that sorted that problem1
When I try run this code and other ones that use VideoStream I get the following error.
Traceback (most recent call last):
…
(h, w) = image.shape[:2]
AttributeError: ‘NoneType’ object has no attribute ‘shape’
I read your article on the causes of this error, I’ve tried simplifying this code to record a video to check I can read my image but no had no luck. My camera works and I’m able to take photos using raspistill and I’m able to load images. Thus I removed and re-installed opencv and numpy last night, but am still having the same problem. Have you got any advice how to resolve this?
Many thanks Sinjon
Adrian Rosebrock
If you’re still getting NoneType errors then OpenCV was likely compiled without video I/O support.
sinjon
Alright that makes sense.
Would this of occurred during the installation / binding stage of opencv? I’ve removed and re-installed and yet it still persisted. I’ve also been trying to installing drivers, changing codec file formats, googling, searching through forums with no luck.
is there a way to download specific video I / O packages?
Adrian Rosebrock
It would have occurred when you installed your video driver libraries + ran CMake to configure the build.
Eeshwar G
Thanks a lot for this post!
I ran the exact same code with the default codec(‘MJPG’) and output format(.avi) and it worked flawlessly.
Eeshwar G
I’m using Python 2.7 with OpenCV 3.2 on an Ubuntu 14.04 system.
Adrian Rosebrock
Fantastic, I’m glad to hear it Eeshwar!
Bietschhorn
Hello Adrian,
Your tutorials are always perfect and I want to thank you for this.
It has functioned immediately for me.
But without any change except the usual upgrade update, I get:
Traceback (most recent call last):
File “WriteVideoRC.py”, line 40, in
…
(h, w) = image.shape[:2]
AttributeError: ‘NoneType’ object has no attribute ‘shape’
I cannot get the reason because I am a newbie
Any idea to help understand the problem ?
Thank you in advance
Adrian Rosebrock
If you are getting
NoneType
errors I would suggest you first read this post on why the happen and how to resolve them.If you are new to OpenCV and image processing then I would highly suggest you work through Practical Python and OpenCV. You’ll quickly get up to speed and master the fundamentals. Be sure to take a look!
sinjon price
Hello Adrian,
How would it be possible to put a mask in one of the boxes?
I’m getting a type error long () argument must be a string or a number, not ‘builtin_function_or_method
I’ve tried converting it to an int and float but then got a type error?
Thank you in advance
Adrian Rosebrock
Hi Sinjon — can you elaborate more on what you mean by “put a mask in one of the boxes”? What exactly are you trying to accomplish?
Rezig
Hi Adrian
I’am wondering if you have any idea about capturing video from blackmagic design intensity shuttle https://www.blackmagicdesign.com/fr/products/intensity is there any method like cv2.VideoCapture() to do that ?
i’ll appreciate your help because i’am stucked in this part 🙁
Adrian Rosebrock
Hi Rezig — Sorry, I do not have any experience with that piece of hardware.
izzy
Hi, first i would like to thank you for your tutorials. I have question, is there any way how to change resolution at videostream? I try “vs = VideoStream(usePiCamera=args[“picamera”] > 0, resolution=(1280,720)).start()” but it didn wotk. Resolution is still 640×480. Im using logitech c270. Thank you for your help!
Adrian Rosebrock
It sounds like you need to modify the
cv2.VideoCapture
object directly. Setting the resolution in this manner can be quite buggy, but it might work in some cases as well. Take a look at the.set
and.get
methods ofcv2.VideoCapture
for more information.izzy
Thanks, but it seems that it work properly only with resolution 640×480 🙂 Weird
M0J0
Hey dude! I have been working on a VideoWriter.write(frame) from a modified VideoCapture.read(vid) for the past 2 hours. Then I googled upon your blog, and tried your MJPG.avi combo and boom, it now works.
Where is your donate button? The anguish you have helped alleviate has to worth a cup of coffee.
Thank you kindly,
Cheers!
M0J0
Adrian Rosebrock
Hi M0J0 — I don’t have a “donate button” per se, but if you would like to show your support of myself and the PyImageSearch blog, definitely consider picking up a copy of my book, Practical Python and OpenCV.
Anthony The Koala
Given that OpenCV is for the processing of video, is there another python module that handles audio such that you can multiplex the audio and video into one file and at the same time being mindful of ‘lip-sync’.
Thank you,
Anthony of Sydney Australia
Adrian Rosebrock
Unfortunately, I do not have any experience working with audio libraries. I hope another PyImageSearch reader can jump in and help.
Mirek Zvolsky
I made tests with more codecs (see: fourcc.org), so I have now
for extension in (‘avi’, ‘wmv’, ‘mpg’, ‘mov’, ‘mp4’, ‘mkv’, ‘3gp’, ‘webm’, ‘ogv’,):
for codec in (‘3IVD’, ‘CJPG’, ‘DIV3’, ‘DIV4’, ‘DIVX’, ‘DX50’, ‘FFV1’, ‘H264’, ‘HFYU’, ‘IJLV’, ‘IYUV’, ‘MJPG’, ‘mp4v’, ‘MP42’, ‘MPEG’, ‘PIM1’, ‘THEO’, ‘V264’, ‘VP80’, ‘WMV1’, ‘WMV2’, ‘WMV3’, ‘X264’, ‘XVID’,):
and I received following in players well running videos from opencv 3 compiled from sources:
X264.3gp/C V264.3gp/C H264.3gp/C
X264.mov/CF V264.mov/CF H264.mov/CF
X264.mp4/CF V264.mp4/CF H264.mp4/CF
X264.mkv/C V264.mkv/C H264.mkv/C
X264.mpg V264.mpg H264.mpg
X264.wmv V264.wmv H264.wmv
THEO.ogv/CF!!
VP80.ogv/C VP80.mov/C VP80.webm/C(from v3)F VP80.mkv/C VP80.wmv/C
FFV1.mov FFV1.mkv
X264.avi/C V264.avi/C H264.avi/C
VP80.3gp/C FFV1.wmv VP80.avi/C FFV1.avi
3IVD.mov DIV4.mov DIV3.mov WMV1.mov 3IVD.3gp WMV1.3gp WMV2.mkv
3IVD.mkv DIV4.mkv DIV3.mkv WMV1.mkv WMV1.wmv WMV2.wmv 3IVD.wmv
DIV4.wmv DIV3.wmv WMV2.avi 3IVD.avi DIV4.avi DIV3.avi WMV1.avi
MP42.mov MP42.3gp MP42.mkv
XVID.3gp/C mp4v.3gp/C DX50.3gp/C DIVX.3gp/C XVID.mov/C DIVX.mov/C
mp4v.mov/C DX50.mov/C XVID.mp4/C mp4v.mp4/C DX50.mp4/C DIVX.mp4/C
MP42.wmv
XVID.mkv/C mp4v.mkv/C DX50.mkv/C DIVX.mkv/C XVID.wmv/C mp4v.wmv/C
DX50.wmv/C DIVX.wmv/C
MP42.avi
XVID.avi/C mp4v.avi/C DX50.avi/C DIVX.avi/C
PIM1.mp4 PIM1.mkv PIM1.mpg PIM1.3gp MPEG.3gp PIM1.wmv MPEG.mp4
MPEG.mkv MPEG.mpg PIM1.avi MPEG.wmv MPEG.avi MJPG.mov IJLV.mov
CJPG.mov MJPG.mp4 IJLV.mp4 CJPG.mp4 MJPG.mkv IJLV.mkv CJPG.mkv
MJPG.wmv MJPG.avi MJPG.3gp CJPG.3gp HFYU.mkv HFYU.avi HFYU.wmv
IYUV.avi IYUV.wmv
Especially interesting is THEO.ogv/CF (created by both opencv 2 (ie. python-opencv) and/or 3) which works in players and both Chrome+Firefox !
Adrian Rosebrock
Wow, thank you for sharing the exhaustive set of tests Mirek! This is great.
Ram
Hi Adrian,
I have implemented this, but i do not get the FPS I want. I am trying to record at 30 fps but i get only 9 fps. I have no idea why. I put in a timer to execute the cleaning up code after 10 seconds and deleted the frames that are repeating.
Also the program when run from a command prompt does not end(i.e does not give an prompt for the next command to be entered.).
Adrian Rosebrock
Hi Ram — it’s hard to say what the exact issue is. Could be a problem with the frames being read from your camera sensor. It could also be the case that you’re pipeline is not reading at 30 FPS and is then only writing the frames back out at 9 FPS (although that seems odd).
Ricardo
Hi Adrian, thanks for the very interesting post. Look, I’m planning to use a raspberry pi to record a long time period (>10 hours). Do you think is a good idea to use the raspberry for this? I’m planning to use a external disk. What would you recommend?
Kind Regards,
Ricardo
Adrian Rosebrock
I don’t see any reason off the top of my head why this wouldn’t work. Raspberry Pi’s are used in production systems.
Nipuna
Hi Adrien,
Thank you for the wonderful post. I’ve create an app to stream 4 videos and record into one video output. I’ve used your post on using threads for different feeds also. Thank you for that too.
While saving using videoWriter I had to to do lot of trial and error to find the correct fps for the output video. Is there a better way to find this ? Also if I am to use different brands of cameras, what should be my approach ?
Adrian Rosebrock
I’m not an expert with video writing and OpenCV, but in general I too have to use trial and error to determine the correct FPS for the output video.
FreeSlave
What is it with always writing to video FROM A CAMERA? Is that the only legal thing to do? I just want to write images from pixel buffers to M-JPEG. I guess it’s so trivial, no one talks about it.
Adrian Rosebrock
You’re correct, it’s not exactly trivial. I’ve made note to cover this in a future blog post.
jsplyy
In constructor function of VideoWriter, I set the fps is 10. But I call videoWriter.write(frame) function more than 10 times per second. So my question is what is the real fps in my saved video and which frames are saved?
Input 100 fps when set fps as 10, what is the result? Will it save 10 fps? which 10 fps in input 100 fps will be saved?
Adrian Rosebrock
If you set the FPS to 10 in the
cv2.VideoWriter
then the output video (should) playback at 10 FPS.amelia
good morning please Im trying to use a part of your wonderfull code to save a video into a file but dont understand the meaning of –codec what i have to put in and fps ?
Adrian Rosebrock
Take a look at this article on video codecs.
Aaron
Hi everyone,
Im doing this with two webcams (USB) and after consistently after 30-40 minutes, they will crash on an exception i can’t seem to catch in python. Both webcams are usb webcam CMOS boards with 2.1mm lenses and are native in 640×480 60fps. I am running 640×480 at 15fps (dial it down).
VIDIOC_DQBUF: No such device
…… and it goes on
I really don’t know what else to do… i’ve tried bumping the gpu and using codecs native to the camera board i.e. MJPG
Adrian Rosebrock
It looks like the crash is happening internally, maybe related to a system thread. I’m honestly not sure, I haven’t encountered this issue before. Have you tried posting on the official OpenCV forums as well? Sorry I couldn’t be of more help here!
Vicky
Hello Adrian, I successfully wrote the video into file. But when I played the video, I found it played much faster than normal. Do you have any idea why it’s like this?
Adrian Rosebrock
It’s likely an issue with the FPS parameter to
cv2.VideoWriter
. You may need to try different FPS values and play around with it.Julian
Hey Adrian,
First, this was an awesome blog. I’ve been looking for something like this for a while.
Second, I am using a laptop with a built in webcam, but I want to instead use a usb webcam. How could I alter the code to use the usb webcam instead?
Thank you for your time,
Julian
Adrian Rosebrock
This code will work with either a USB webcam, builtin webcam, or Raspberry Pi camera module.
Rohit sharma
If I want output in whole screen instead of splitting the screen into four what should i do?
I have commented the rest of the three but its only showing output of left top corner.
output[0:h, 0:w] = frame
#output[0:h,w:w*2] = R
#output[h:h, w:w*2] = G
#output[h:h, 0:w] = B
I also tried changing the ration but its giving me error
Adrian Rosebrock
Try giving this blog post a read for an example.
Zubair Ahmed
I just ran into this stupid video not saving issue like alot of others and for the life of me I couldn’t figure out what the real issue is after trying few codec/file extension changes, in the end I had to resort to an external screen capturing tool to record video which works
Adrian Rosebrock
Writing to video with OpenCV can be super frustrating. I’m curious if anyone has used scikit-video? I haven’t given the library a try but I’d consider writing a post on it if there was enough interest.
Ibrahim
Any body tried on Ubuntu 16.04 ? I spent many hours and tried alot of combinations but in-vain. ;(. Can someone suggest me or had experienced before ?
Javid Khan
Hi guys,
This is a great thread, thank you for sharing. I also spent hours over format/codec compatibilities.
Here are my findings for working video formats/codec examples on Mac OSX 10.14 Mojave using python 3.7.3 & OpenCV 4.1.0:
{
“avi” : [ “avc1”, “DIVX”, “H264”, “X264”, “V264”, “IYUV”, “MJPG”, “MPEG”, “MP42”, “mp4v”, “XVID” ],
“mov” : [ “avc1”, “DIVX”, “mp4v”, “XVID” ],
“mp4” : [ “avc1”, “mp4v” ],
“mkv” : [ “avc1”, “DIVX”, “H264”, “X264”, “V264”, “IYUV”, “MJPG”, “MPEG”, “MP42”, “mp4v”, “XVID” ],
“3gp” : [ “avc1”, “mp4v” ]
}
Analysis conclusions:
– All formats & codecs work in VLC Player
– The “best” formats are: avi & mkv which work across all of the codecs
– The following combos work in Quicktime player: 3gp (avc1, mp4v); avi (MJPG); mp4 (avc1, mp4v); mov (avc1, mp4v)
Notes:
– avc1 is equivalent/identical to H264, X264, V264
– mp4v is the same as DIVX, XVID
File size & compression
– most compact format: avc1
– least compact format is IYUV (by a long shot), followed by MPJPG/MPEG
– middle/similar: MP42, mp4v
Recommendation:
– use avi or mkv for best compatibility across all codecs for the maximum flexibility
– use mp4 (avc1, mp4v) for compatibility across players with most/reasonable compression
Next steps:
– Repeat exercise on Win
– Try Windows media players
Adrian Rosebrock
Thanks so much for sharing these results, Javid!
P.S. I had to edit your comment to remove the file size breakdown as the formatting was causing too much text overflow.
Ankit Kumar
Hi Adrian, I found your tutorials very niche and effective and this one isn’t an exception. However, I am facing problems while saving the video file to a location on my mac – The file is getting saved but it is basically empty, i.e., I cannot see any content that was there when I had passed it on as an input. Please help.
Adrian Rosebrock
Working with video can be a big pain with OpenCV. I would suggest you read the comments to this tutorial as they discuss combinations of video codecs and file extensions that work on varying operating systems.
Sameer
Is there a way that we can divide the streaming into chunks of constant value like 10 minutes?