
Table of Contents

Let’s wind the clocks back a week or two. In the first tutorial, we learned about the fundamentals of Computer Graphics and image rendering. In the second tutorial, we went deeper into the core ideas proposed by NeRF and implemented them using TensorFlow and Keras.
We begin by reminding ourselves of the original problem we set out to solve:
What if there was a way to capture the entire 3D scene just from a sparse set of 2D pictures?
We have come a long way to solve this problem. We have created the architecture and the components needed to build NeRF. But we don’t know yet how each piece fits in the larger picture.
In this tutorial, we assemble all the details to train the NeRF model.
This lesson is the final part of a 3-part series on Computer Graphics and Deep Learning with NeRF using TensorFlow and Keras:
- Computer Graphics and Deep Learning with NeRF using TensorFlow and Keras: Part 1 (first week’s tutorial)
- Computer Graphics and Deep Learning with NeRF using TensorFlow and Keras: Part 2 (previous week’s tutorial)
- Computer Graphics and Deep Learning with NeRF using TensorFlow and Keras: Part 3 (this week’s tutorial)
To learn about volume rendering using Neural Radiance Fields or NeRF, just keep reading.
Computer Graphics and Deep Learning with NeRF using TensorFlow and Keras: Part 3
In this week’s tutorial, we will be explicitly looking at training the NeRF Multilayer Perceptron (MLP) that we built last week. We have divided this tutorial into the following sections:
- NeRF Assemble: How to train a NeRF
- NeRF Trainer: A helper model which trains the coarse and the fine NeRF models
- Custom callback: A custom callback that helps us visualize the training process
- Tying it all together: Bringing together all of the components
- Inference: Build the 3D scene from a trained NeRF model
Configuring Your Development Environment
To follow this guide, you need to have the TensorFlow library installed on your system.
Luckily, TensorFlow is pip-installable:
$ pip install tensorflow
Having Problems Configuring Your Development Environment?
All that said, are you:
- Short on time?
- Learning on your employer’s administratively locked system?
- Wanting to skip the hassle of fighting with the command line, package managers, and virtual environments?
- Ready to run the code right now on your Windows, macOS, or Linux system?
Then join PyImageSearch University today!
Gain access to Jupyter Notebooks for this tutorial and other PyImageSearch guides that are pre-configured to run on Google Colab’s ecosystem right in your web browser! No installation required.
And best of all, these Jupyter Notebooks will run on Windows, macOS, and Linux!
Project Structure
Let’s recall our project directory structure from the previous week’s tutorial.
Start by accessing the “Downloads” section of this tutorial to retrieve the source code. We also expect you to download the dataset and keep it handy. You can find details about the dataset in the first tutorial.
From there, let’s take a look at the directory structure:
$ tree --dirsfirst
.
├── dataset
│   ├── test
│   │   ├── r_0_depth_0000.png
│   │   ├── r_0_normal_0000.png
│   │   ├── r_0.png
│   │   ├── ..
│   │   └── ..
│   ├── train
│   │   ├── r_0.png
│   │   ├── r_10.png
│   │   ├── ..
│   │   └── ..
│   ├── val
│   │   ├── r_0.png
│   │   ├── r_10.png
│   │   ├── ..
│   │   └── ..
│   ├── transforms_test.json
│   ├── transforms_train.json
│   └── transforms_val.json
├── pyimagesearch
│   ├── config.py
│   ├── data.py
│   ├── encoder.py
│   ├── __init__.py
│   ├── nerf.py
│   ├── nerf_trainer.py
│   ├── train_monitor.py
│   └── utils.py
├── inference.py
└── train.py
The dataset folder contains three subfolders, train, test, and val for the training, testing, and validation images.
The pyimagesearch folder contains all of the python scripts we will be using for training. These were discussed and explained in the previous week’s tutorial.
Next, we have the two driver scripts: train.py and inference.py. We train our NeRF model with the train.py script. With the inference.py, we generate a video of a 360-degree view of the scenery from the trained NeRF model.
NeRF Assemble
In this section, we assemble (pun intended) all of the components explained in the previous blog post and head on to training the NeRF model. This section will cover three python scripts.
nerf_trainer.py: custom keras model to train the coarse and fine modelstrain_monitor.py: a custom callback to visualize and draw insights from the training processtrain.py: the final script that brings everything together
Consider this section as the ultimate battle cry like Figure 2. By the time we finish this section, we will be ready with our trained NeRF model.

NeRF Trainer
tf.keras has a beautiful fit API called to train a model. When the training pipeline becomes complicated, we build a custom tf.keras.Model and a custom train_step. This way, we can still leverage the fit function. We recommend the official keras tutorial on customizing the fit call to anyone who wants to go deeper.
In the NeRF training pipeline, the MLP is simple. The only complications we face are volume rendering and hierarchical sampling.
Take note that we train two models (coarse and fine) with hierarchical sampling instead of one. To encapsulate everything inside the fit call, we build a custom NeRF_Trainer model.
The NeRF_Trainer is written in pyimagesearch/nerf_trainer.py. Let’s open the file and go through the script to understand it better.
# import the necessary packages
from tensorflow.keras.metrics import Mean
import tensorflow as tf
We begin with the necessary imports in Lines 2-3.
class Nerf_Trainer(tf.keras.Model):
	def __init__(self, coarseModel, fineModel, lxyz, lDir,
		encoderFn, renderImageDepth, samplePdf, nF):
		super().__init__()
		# define the coarse model and fine model
		self.coarseModel = coarseModel
		self.fineModel = fineModel

		# define the dimensions for positional encoding for spatial
		# coordinates and direction
		self.lxyz = lxyz
		self.lDir = lDir

		# define the positional encoder
		self.encoderFn = encoderFn

		# define the volume rendering function
		self.renderImageDepth = renderImageDepth

		# define the hierarchical sampling function and the number of
		# samples for the fine model
		self.samplePdf = samplePdf
		self.nF = nF
On Lines 6-27, the __init__ method serves as the Nerf_Trainer model constructor. The method accepts the following parameters:
coarseModel: the coarse NeRF modelfineModel: the fine NeRF modellxyz: the number of dimensions used for positional encoding of thexyzcoordinateslDir: the number of dimensions used for positional encoding of the direction vectorencoderFn: positional encoding function for the modelrenderImageDepth: the volume rendering functionsamplePdf: utility function for hierarchical samplingnF: number of fine model samples
	def compile(self, optimizerCoarse, optimizerFine, lossFn):
		super().compile()
		# define the optimizer for the coarse and fine model
		self.optimizerCoarse = optimizerCoarse
		self.optimizerFine = optimizerFine

		# define the photometric loss function
		self.lossFn = lossFn

		# define the loss and psnr tracker
		self.lossTracker = Mean(name="loss")
		self.psnrMetric = Mean(name="psnr")
On Lines 29-40, we define the compile method, which is called when the Nerf_Trainer model is compiled. The method accepts the following parameters:
optimizerCoarse: the optimizer for the coarse modeloptimizerFine: the optimizer for the fine modellossFn: the loss function for the NeRF models
On Lines 39 and 40, we define two trackers, namely lossTracker and psnrTracker. We use these trackers to track the model loss and the PSNR between original and predicted images.
	def train_step(self, inputs):
		# get the images and the rays
		(elements, images) = inputs
		(raysOriCoarse, raysDirCoarse, tValsCoarse) = elements

		# generate the coarse rays
		raysCoarse = (raysOriCoarse[..., None, :] +
			(raysDirCoarse[..., None, :] * tValsCoarse[..., None]))

		# positional encode the rays and dirs
		raysCoarse = self.encoderFn(raysCoarse, self.lxyz)
		dirCoarseShape = tf.shape(raysCoarse[..., :3])
		dirsCoarse = tf.broadcast_to(raysDirCoarse[..., None, :],
			shape=dirCoarseShape)
		dirsCoarse = self.encoderFn(dirsCoarse, self.lDir)
Now we start with the train_step method (Lines 42-127). This method is called when we do a model.fit() on the Nerf_Trainer custom model. The following points explain the train_step method:
- Lines 44 and 45 unpack the input.
- Lines 48 and 49 generate the rays for the coarse model.
- Lines 52-56 encode the ray and direction using the positional encoding function.
		# keep track of our gradients
		with tf.GradientTape() as coarseTape:
			# compute the predictions from the coarse model
			(rgbCoarse, sigmaCoarse) = self.coarseModel([raysCoarse,
				dirsCoarse])

			# render the image from the predictions
			renderCoarse = self.renderImageDepth(rgb=rgbCoarse,
				sigma=sigmaCoarse, tVals=tValsCoarse)
			(imagesCoarse, _, weightsCoarse) = renderCoarse

			# compute the photometric loss
			lossCoarse = self.lossFn(images, imagesCoarse)
- On Lines 59-70, we define the forward pass of the coarse model. On Lines 61 and 62, the model takes in rays and directions as input and produces
rgb(color) andsigma(volume density). - These outputs (
rgbandsigma) are then passed through therenderImageDepthfunction (for volume rendering) and produce the image depth map and the weights (Lines 65-67). - On Line 70, we compute the mean-squared error between the target image and the rendered image for the coarse model.
		# compute the middle values of t vals
		tValsCoarseMid = (0.5 *
			(tValsCoarse[..., 1:] + tValsCoarse[..., :-1]))

		# apply hierarchical sampling and get the t vals for the fine
		# model
		tValsFine = self.samplePdf(tValsMid=tValsCoarseMid,
			weights=weightsCoarse, nF=self.nF)
		tValsFine = tf.sort(
			tf.concat([tValsCoarse, tValsFine], axis=-1), axis=-1)

		# build the fine rays and positional encode it
		raysFine = (raysOriCoarse[..., None, :] +
			(raysDirCoarse[..., None, :] * tValsFine[..., None]))
		raysFine = self.encoderFn(raysFine, self.lxyz)

		# build the fine directions and positional encode it
		dirsFineShape = tf.shape(raysFine[..., :3])
		dirsFine = tf.broadcast_to(raysDirCoarse[..., None, :],
			shape=dirsFineShape)
		dirsFine = self.encoderFn(dirsFine, self.lDir)
- On Lines 73-81, we compute the
tValsFinefor the fine model using thesample_pdffunction - Next we build the rays and directions for the fine model (Lines 84-92).
		# keep track of our gradients
		with tf.GradientTape() as fineTape:
			# compute the predictions from the fine model
			rgbFine, sigmaFine = self.fineModel([raysFine, dirsFine])

			# render the image from the predictions
			renderFine = self.renderImageDepth(rgb=rgbFine,
				sigma=sigmaFine, tVals=tValsFine)
			(imageFine, _, _) = renderFine

			# compute the photometric loss
			lossFine = self.lossFn(images, imageFine)
- Lines 94-105 are used to define the forward pass of the fine model. This is identical to the forward pass of the coarse model.
		# get the trainable variables from the coarse model and
		# apply back propagation
		tvCoarse = self.coarseModel.trainable_variables
		gradsCoarse = coarseTape.gradient(lossCoarse, tvCoarse)
		self.optimizerCoarse.apply_gradients(zip(gradsCoarse,
			tvCoarse))

		# get the trainable variables from the coarse model and
		# apply back propagation
		tvFine = self.fineModel.trainable_variables
		gradsFine = fineTape.gradient(lossFine, tvFine)
		self.optimizerFine.apply_gradients(zip(gradsFine, tvFine))
		psnr = tf.image.psnr(images, imageFine, max_val=1.0)

		# compute the loss and psnr metrics
		self.lossTracker.update_state(lossFine)
		self.psnrMetric.update_state(psnr)

		# return the loss and psnr metrics
		return {"loss": self.lossTracker.result(),
			"psnr": self.psnrMetric.result()}
- On Line 109, we obtain the trainable parameters of the coarse model. The gradient of these parameters is computed (Line 110). We apply the computed gradients on these parameters using the optimizer (Lines 111 and 112)
- The same is then repeated for the parameters of the fine model (Lines 116-119).
- Lines 122 and 123 are used to update the loss and peak signal-to-noise ratio (PSNR) tracker, which is then returned on Lines 126 and 127.
	def test_step(self, inputs):
		# get the images and the rays
		(elements, images) = inputs
		(raysOriCoarse, raysDirCoarse, tValsCoarse) = elements

		# generate the coarse rays
		raysCoarse = (raysOriCoarse[..., None, :] +
			(raysDirCoarse[..., None, :] * tValsCoarse[..., None]))

		# positional encode the rays and dirs
		raysCoarse = self.encoderFn(raysCoarse, self.lxyz)
		dirCoarseShape = tf.shape(raysCoarse[..., :3])
		dirsCoarse = tf.broadcast_to(raysDirCoarse[..., None, :],
			shape=dirCoarseShape)
		dirsCoarse = self.encoderFn(dirsCoarse, self.lDir)

		# compute the predictions from the coarse model
		(rgbCoarse, sigmaCoarse) = self.coarseModel([raysCoarse,
			dirsCoarse])

		# render the image from the predictions
		renderCoarse = self.renderImageDepth(rgb=rgbCoarse,
			sigma=sigmaCoarse, tVals=tValsCoarse)
		(_, _, weightsCoarse) = renderCoarse

		# compute the middle values of t vals
		tValsCoarseMid = (0.5 *
			(tValsCoarse[..., 1:] + tValsCoarse[..., :-1]))

		# apply hierarchical sampling and get the t vals for the fine
		# model
		tValsFine = self.samplePdf(tValsMid=tValsCoarseMid,
			weights=weightsCoarse, nF=self.nF)
		tValsFine = tf.sort(
			tf.concat([tValsCoarse, tValsFine], axis=-1), axis=-1)

		# build the fine rays and positional encode it
		raysFine = (raysOriCoarse[..., None, :] +
			(raysDirCoarse[..., None, :] * tValsFine[..., None]))
		raysFine = self.encoderFn(raysFine, self.lxyz)

		# build the fine directions and positional encode it
		dirsFineShape = tf.shape(raysFine[..., :3])
		dirsFine = tf.broadcast_to(raysDirCoarse[..., None, :],
			shape=dirsFineShape)
		dirsFine = self.encoderFn(dirsFine, self.lDir)

		# compute the predictions from the fine model
		rgbFine, sigmaFine = self.fineModel([raysFine, dirsFine])

		# render the image from the predictions
		renderFine = self.renderImageDepth(rgb=rgbFine,
			sigma=sigmaFine, tVals=tValsFine)
		(imageFine, _, _) = renderFine

		# compute the photometric loss and psnr
		lossFine = self.lossFn(images, imageFine)
		psnr = tf.image.psnr(images, imageFine, max_val=1.0)

		# compute the loss and psnr metrics
		self.lossTracker.update_state(lossFine)
		self.psnrMetric.update_state(psnr)

		# return the loss and psnr metrics
		return {"loss": self.lossTracker.result(),
			"psnr": self.psnrMetric.result()}

	@property
	def metrics(self):
		# return the loss and psnr tracker
		return [self.lossTracker, self.psnrMetric]
Now we define the test_step (Lines 129-194). The test_step and train_step are identical. The only difference is we do not compute the gradients in the test_step.
Finally, we define the loss tracker and the PSNR tracker as class properties (Lines 196-199).
Custom Callback
An important point to note here is that the NeRF model is very memory intensive. Therefore, while it would be cool to see the result, it is equally important to visualize each training process step.
To visualize each step, we create a custom callback. We recommend going through this tutorial to get a better understanding of custom callbacks in Keras.
Let’s open pyimagesearch/train_monitor.py and start digging.
# import the necessary packages
from tensorflow.keras.preprocessing.image import array_to_img
from tensorflow.keras.callbacks import Callback
import matplotlib.pyplot as plt
import tensorflow as tf
We begin with importing the necessary packages for this script (Lines 2-5).
def get_train_monitor(testDs, encoderFn, lxyz, lDir, imagePath):
	# grab images and rays from the testing dataset
	(tElements, tImages) = next(iter(testDs))
	(tRaysOriCoarse, tRaysDirCoarse, tTvalsCoarse) = tElements

	# build the test coarse ray
	tRaysCoarse = (tRaysOriCoarse[..., None, :] +
		(tRaysDirCoarse[..., None, :] * tTvalsCoarse[..., None]))

	# positional encode the rays and direction vectors for the coarse
	# ray
	tRaysCoarse = encoderFn(tRaysCoarse, lxyz)
	tDirsCoarseShape = tf.shape(tRaysCoarse[..., :3])
	tDirsCoarse = tf.broadcast_to(tRaysDirCoarse[..., None, :],
		shape=tDirsCoarseShape)
	tDirsCoarse = encoderFn(tDirsCoarse, lDir)
- On Line 7, we define the
get_train_monitormethod which builds and returns a custom callback. - On Lines 9 and 10, we unpack the inputs from the
testDs(test dataset). - Next on Lines 13 and 14, we generate the rays for the coarse model.
- On Lines 18-22, we encode the rays and directions for the coarse model using positional encoding.
	class TrainMonitor(Callback):
		def on_epoch_end(self, epoch, logs=None):
			# compute the coarse model prediction
			(tRgbCoarse, tSigmaCoarse) = self.model.coarseModel.predict(
				[tRaysCoarse, tDirsCoarse])

			# render the image from the model prediction
			tRenderCoarse = self.model.renderImageDepth(rgb=tRgbCoarse,
				sigma=tSigmaCoarse, tVals=tTvalsCoarse)
			(tImageCoarse, _, tWeightsCoarse) = tRenderCoarse

			# compute the middle values of t vals
			tTvalsCoarseMid = (0.5 *
				(tTvalsCoarse[..., 1:] + tTvalsCoarse[..., :-1]))

			# apply hierarchical sampling and get the t vals for the
			# fine model
			tTvalsFine = self.model.samplePdf(
				tValsMid=tTvalsCoarseMid, weights=tWeightsCoarse,
				nF=self.model.nF)
			tTvalsFine = tf.sort(
				tf.concat([tTvalsCoarse, tTvalsFine], axis=-1),
				axis=-1)

			# build the fine rays and positional encode it
			tRaysFine = (tRaysOriCoarse[..., None, :] +
				(tRaysDirCoarse[..., None, :] * tTvalsFine[..., None])
			)
			tRaysFine = self.model.encoderFn(tRaysFine, lxyz)

			# build the fine directions and positional encode it
			tDirsFineShape = tf.shape(tRaysFine[..., :3])
			tDirsFine = tf.broadcast_to(tRaysDirCoarse[..., None, :],
				shape=tDirsFineShape)
			tDirsFine = self.model.encoderFn(tDirsFine, lDir)

			# compute the fine model prediction
			tRgbFine, tSigmaFine = self.model.fineModel.predict(
				[tRaysFine, tDirsFine])

			# render the image from the model prediction
			tRenderFine = self.model.renderImageDepth(rgb=tRgbFine,
				sigma=tSigmaFine, tVals=tTvalsFine)
			(tImageFine, tDepthFine, _) = tRenderFine

			# plot the coarse image, fine image, fine depth map and
			# target image
			(_, ax) = plt.subplots(nrows=1, ncols=4, figsize=(10, 10))
			ax[0].imshow(array_to_img(tImageCoarse[0]))
			ax[0].set_title(f"Corase Image")

			ax[1].imshow(array_to_img(tImageFine[0]))
			ax[1].set_title(f"Fine Image")

			ax[2].imshow(array_to_img(tDepthFine[0, ..., None]),
				cmap="inferno")
			ax[2].set_title(f"Fine Depth Image")

			ax[3].imshow(array_to_img(tImages[0]))
			ax[3].set_title(f"Real Image")

			plt.savefig(f"{imagePath}/{epoch:03d}.png")
			plt.close()

	# instantiate a train monitor callback
	trainMonitor = TrainMonitor()

	# return the train monitor
	return trainMonitor
We define the on_epoch_end function inside the custom callback class to help visualize training logs and figures (Line 25). As the name suggests, this function is only triggered on every epoch end of the model training
- On Lines 27 and 28, we predict the color and volume density using the coarse model. Next, on Lines 31-33, we render the coarse image using the volumetric rendering function
renderImageDepth. - We then generate fine sample points using hierarchical sampling (Lines 36-46).
- On Lines 49-51, we use the fine sample points and generate the fine rays by multiplying the fine sample points with the coarse rays.
- On Line 52, we encode the fine rays using positional encoding.
- We then extract the direction component from the rays (Line 55) and reshape it (Lines 56 and 57), and finally encode the directions using positional encoding (Line 58).
- The fine rays, directions, and the model are then used to predict the refined color and volume density (Lines 61 and 62). We use these to render the image and the depth map on Lines 65-67.
- The coarse image, fine image, and depth maps are then visualized on Lines 71-86.
- On Line 89, we instantiate the train monitor callback and then return it on Line 92.
Tying It All Together
With all the components in hand, we will finally be able to train our NeRF model using the script given below. Let’s open train.py and start going through it.
# USAGE
# python train.py

# setting seed for reproducibility
import tensorflow as tf
tf.random.set_seed(42)

# import the necessary packages
from pyimagesearch.data import read_json
from pyimagesearch.data import get_image_c2w
from pyimagesearch.data import GetImages
from pyimagesearch.data import GetRays
from pyimagesearch.utils import get_focal_from_fov, render_image_depth, sample_pdf
from pyimagesearch.encoder import encoder_fn
from pyimagesearch.nerf import get_model
from pyimagesearch.nerf_trainer import Nerf_Trainer
from pyimagesearch.train_monitor import get_train_monitor
from pyimagesearch import config
from tensorflow.keras.optimizers import Adam
from tensorflow.keras.losses import MeanSquaredError
import os
On Line 6, we set the random seed for reproducibility. Next, we begin by importing the necessary packages (Lines 5-21).
# get the train validation and test data
print("[INFO] grabbing the data from json files...")
jsonTrainData = read_json(config.TRAIN_JSON)
jsonValData = read_json(config.VAL_JSON)
jsonTestData = read_json(config.TEST_JSON)

focalLength = get_focal_from_fov(
	fieldOfView=jsonTrainData["camera_angle_x"],
	width=config.IMAGE_WIDTH)

# print the focal length of the camera
print(f"[INFO] focal length of the camera: {focalLength}...")
On Lines 25-27, we extract the train, test, and validation data from the respective json files. We then calculate the camera’s focal length (Lines 29-34) and print the same.
# get the train, validation, and test image paths and camera2world
# matrices
print("[INFO] grabbing the image paths and camera2world matrices...")
trainImagePaths, trainC2Ws = get_image_c2w(jsonData=jsonTrainData,
	datasetPath=config.DATASET_PATH)
valImagePaths, valC2Ws = get_image_c2w(jsonData=jsonValData,
	datasetPath=config.DATASET_PATH)
testImagePaths, testC2Ws = get_image_c2w(jsonData=jsonTestData,
	datasetPath=config.DATASET_PATH)

# instantiate a object of our class used to load images from disk
getImages = GetImages(imageHeight=config.IMAGE_HEIGHT,
	imageWidth=config.IMAGE_WIDTH)

# get the train, validation, and test image dataset
print("[INFO] building the image dataset pipeline...")
trainImageDs = (
	tf.data.Dataset.from_tensor_slices(trainImagePaths)
	.map(getImages, num_parallel_calls=config.AUTO)
)
valImageDs = (
	tf.data.Dataset.from_tensor_slices(valImagePaths)
	.map(getImages, num_parallel_calls=config.AUTO)
)
testImageDs = (
	tf.data.Dataset.from_tensor_slices(testImagePaths)
	.map(getImages, num_parallel_calls=config.AUTO)
)
We construct the image paths and camera-to-world matrices (Lines 39-44) from the json data extracted earlier.
Next, we build the tf.data image dataset (Lines 52-63). These include the train, test, and validation datasets, respectively.
# instantiate the GetRays object
getRays = GetRays(focalLength=focalLength, imageWidth=config.IMAGE_WIDTH,
	imageHeight=config.IMAGE_HEIGHT, near=config.NEAR, far=config.FAR,
	nC=config.N_C)

# get the train validation and test rays dataset
print("[INFO] building the rays dataset pipeline...")
trainRayDs = (
	tf.data.Dataset.from_tensor_slices(trainC2Ws)
	.map(getRays, num_parallel_calls=config.AUTO)
)
valRayDs = (
	tf.data.Dataset.from_tensor_slices(valC2Ws)
	.map(getRays, num_parallel_calls=config.AUTO)
)
testRayDs = (
	tf.data.Dataset.from_tensor_slices(testC2Ws)
	.map(getRays, num_parallel_calls=config.AUTO)
)
On Lines 66-68, we instantiate an object of the GetRays class. We then create the tf.data train, validation, and testing ray dataset (Lines 72-83).
# zip the images and rays dataset together
trainDs = tf.data.Dataset.zip((trainRayDs, trainImageDs))
valDs = tf.data.Dataset.zip((valRayDs, valImageDs))
testDs = tf.data.Dataset.zip((testRayDs, testImageDs))

# build data input pipeline for train, val, and test datasets
trainDs = (
	trainDs
	.shuffle(config.BATCH_SIZE)
	.batch(config.BATCH_SIZE)
	.repeat()
	.prefetch(config.AUTO)
)
valDs = (
	valDs
	.shuffle(config.BATCH_SIZE)
	.batch(config.BATCH_SIZE)
	.repeat()
	.prefetch(config.AUTO)
)
testDs = (
	testDs
	.batch(config.BATCH_SIZE)
	.prefetch(config.AUTO)
)
The image and ray dataset are then zipped together (Lines 86-88). All the datasets (train, validation, and test) are then shuffled, batched, repeated, and prefetched on (Lines 91-109).
# instantiate the coarse model
coarseModel = get_model(lxyz=config.L_XYZ, lDir=config.L_DIR,
	batchSize=config.BATCH_SIZE, denseUnits=config.DENSE_UNITS,
	skipLayer=config.SKIP_LAYER)

# instantiate the fine model
fineModel = get_model(lxyz=config.L_XYZ, lDir=config.L_DIR,
	batchSize=config.BATCH_SIZE, denseUnits=config.DENSE_UNITS,
	skipLayer=config.SKIP_LAYER)

# instantiate the nerf trainer model
nerfTrainerModel = Nerf_Trainer(coarseModel=coarseModel, fineModel=fineModel,
	lxyz=config.L_XYZ, lDir=config.L_DIR, encoderFn=encoder_fn,
	renderImageDepth=render_image_depth, samplePdf=sample_pdf,
	nF=config.N_F)

# compile the nerf trainer model with Adam optimizer and MSE loss
nerfTrainerModel.compile(optimizerCoarse=Adam(),optimizerFine=Adam(),
	lossFn=MeanSquaredError())
Now we define the coarse and the fine models in (Lines 112-119). Next, we define the nerfTrainerModel, which is a custom keras model that trains the coarse and fine model together (Lines 122-125).
On Lines 128 and 129, we compile the nerfTrainerModel with suitable optimizer (here Adam) and loss function (here mean-squared error).
# check if the output image directory already exists, if it doesn't,
# then create it
if not os.path.exists(config.IMAGE_PATH):
	os.makedirs(config.IMAGE_PATH)

# get the train monitor callback
trainMonitorCallback = get_train_monitor(testDs=testDs,
	encoderFn=encoder_fn, lxyz=config.L_XYZ, lDir=config.L_DIR,
	imagePath=config.IMAGE_PATH)

# train the NeRF model
print("[INFO] training the nerf model...")
nerfTrainerModel.fit(trainDs, steps_per_epoch=config.STEPS_PER_EPOCH,
	validation_data=valDs, validation_steps=config.VALIDATION_STEPS,
	epochs=config.EPOCHS, callbacks=[trainMonitorCallback],
)

# save the coarse and fine model
nerfTrainerModel.coarseModel.save(config.COARSE_PATH)
nerfTrainerModel.fineModel.save(config.FINE_PATH)
Lines 133-139 create the output directory and initialize the trainMonitorCallback. Finally, we train the nerfTrainerModel with the training dataset and validate it with the validation dataset (Lines 143-146).
We wrap up the training process by storing the trained coarse and fine models to disk (Lines 149 and 150).
Inference
Take a minute and congratulate yourself, as in Figure 3. We started from the basics, and now we have successfully trained NeRF. This was a long journey, and I am happy we did this together.

After all the hard work, what is better than seeing the results.
We have modeled the entire 3D scenery in the MLP, right? Why not rotate the camera around the entire scene and click pictures?
In this section, we will ask our model to synthesize novel views from the 3D scenery that it just modeled. We will be synthesizing novel views across 360 degrees in the  axis.
axis.
If you are unfamiliar with and  axes in the 3D coordinate system, you can quickly revise your concepts with Figures 4 and 5.
axis. axis.Let’s open inference.py to visualize the complete rotation about theta axes.
# import the necessary packages
from pyimagesearch import config
from pyimagesearch.utils import pose_spherical
from pyimagesearch.data import GetRays
from pyimagesearch.utils import get_focal_from_fov
from pyimagesearch.data import read_json
from pyimagesearch.encoder import encoder_fn
from pyimagesearch.utils import render_image_depth
from pyimagesearch.utils import sample_pdf
from tensorflow.keras.models import load_model
from tqdm import tqdm
import tensorflow as tf
import numpy as np
import imageio
import os
We begin with our usual necessary imports (Lines 2-15).
# create a camera2world matrix list to store the novel view
# camera2world matrices
c2wList = []

# iterate over theta and generate novel view camera2world matrices
for theta in np.linspace(0.0, 360.0, config.SAMPLE_THETA_POINTS,
	endpoint=False):
	# generate camera2world matrix
	c2w = pose_spherical(theta, -30.0, 4.0)

	# append the new camera2world matrix into the collection
	c2wList.append(c2w)

# get the train validation and test data
print("[INFO] grabbing the data from json files...")
jsonTrainData = read_json(config.TRAIN_JSON)

focalLength = get_focal_from_fov(
	fieldOfView=jsonTrainData["camera_angle_x"],
	width=config.IMAGE_WIDTH)

# instantiate the GetRays object
getRays = GetRays(focalLength=focalLength, imageWidth=config.IMAGE_WIDTH,
	imageHeight=config.IMAGE_HEIGHT, near=config.NEAR, far=config.FAR,
	nC=config.N_C)

# create a dataset from the novel view camera2world matrices
ds = (
	tf.data.Dataset.from_tensor_slices(c2wList)
	.map(getRays)
	.batch(config.BATCH_SIZE)
)

# load the coarse and the fine model
coarseModel = load_model(config.COARSE_PATH, compile=False)
fineModel = load_model(config.FINE_PATH, compile=False)
Next, on Line 19, we build an empty list of camera-to-world matrices c2w. On Line 22, we iterate over a range of 0 to 360. The range corresponds to the theta values that we will be using. We keep phi as -30 and distance as 4. These values, theta, phi, and distance, are passed into the function pose_spherical to obtain our camera-to-world matrices (Lines 25-28).
On Lines 31-48, we grab the training json data and extract the rays and focal length. We then create a dataset and batch it as needed.
On Lines 51 and 52, we load the pretrained coarse and fine model.
# create a list to hold all the novel view from the nerf model
print("[INFO] grabbing the novel views...")
frameList = []
for element in tqdm(ds):
	(raysOriCoarse, raysDirCoarse, tValsCoarse) = element

	# generate the coarse rays
	raysCoarse = (raysOriCoarse[..., None, :] +
		(raysDirCoarse[..., None, :] * tValsCoarse[..., None]))

	# positional encode the rays and dirs
	raysCoarse = encoder_fn(raysCoarse, config.L_XYZ)
	dirCoarseShape = tf.shape(raysCoarse[..., :3])
	dirsCoarse = tf.broadcast_to(raysDirCoarse[..., None, :],
		shape=dirCoarseShape)
	dirsCoarse = encoder_fn(dirsCoarse, config.L_DIR)

	# compute the predictions from the coarse model
	(rgbCoarse, sigmaCoarse) = coarseModel.predict(
		[raysCoarse, dirsCoarse])

	# render the image from the predictions
	renderCoarse = render_image_depth(rgb=rgbCoarse,
		sigma=sigmaCoarse, tVals=tValsCoarse)
	(_, _, weightsCoarse) = renderCoarse

	# compute the middle values of t vals
	tValsCoarseMid = (0.5 *
		(tValsCoarse[..., 1:] + tValsCoarse[..., :-1]))

	# apply hierarchical sampling and get the t vals for the fine
	# model
	tValsFine = sample_pdf(tValsMid=tValsCoarseMid,
		weights=weightsCoarse, nF=config.N_F)
	tValsFine = tf.sort(
		tf.concat([tValsCoarse, tValsFine], axis=-1), axis=-1)

	# build the fine rays and positional encode it
	raysFine = (raysOriCoarse[..., None, :] +
		(raysDirCoarse[..., None, :] * tValsFine[..., None]))
	raysFine = encoder_fn(raysFine, config.L_XYZ)

	# build the fine directions and positional encode it
	dirsFineShape = tf.shape(raysFine[..., :3])
	dirsFine = tf.broadcast_to(raysDirCoarse[..., None, :],
		shape=dirsFineShape)
	dirsFine = encoder_fn(dirsFine, config.L_DIR)

	# compute the predictions from the fine model
	(rgbFine, sigmaFine) = fineModel.predict([raysFine, dirsFine])

	# render the image from the predictions
	renderFine = render_image_depth(rgb=rgbFine, sigma=sigmaFine,
		tVals=tValsFine)
	(imageFine, _, _) = renderFine

	# insert the rendered fine image to the collection
	frameList.append(imageFine.numpy()[0])
We iterate through our created dataset and unpack ray origin, ray direction, and sample points for each element in the dataset (Lines 57 and 58). We use these to render our coarse and fine scenes exactly as we did in training. This is explained in the following points:
- The inputs are then broadcasted to suitable shapes, passed through the encoder function, and finally into the coarse model to predict
rgbCoarseandsigmaCoarse(Lines 61-73). - On Lines 76-78, the color and volume density obtained is passed through the
render_image_depthfunction to produce rendered images. - On Lines 81-89, we use the mid values of these samples and the weights derived from the rendered image to compute
tValsFineusing thesample_pdffunction. - On Lines 92-100, we build the fine model rays and position encode it and then repeat the same for directions of the fine rays.
- We render the fine image using the predictions from the fine model. The novel views are then appended to
frameList(Lines 103-111).
# check if the output video directory exists, if it does not, then
# create it
if not os.path.exists(config.VIDEO_PATH):
	os.makedirs(config.VIDEO_PATH)

# build the video from the frames and save it to disk
print("[INFO] creating the video from the frames...")
imageio.mimwrite(config.OUTPUT_VIDEO_PATH, frameList, fps=config.FPS,
	quality=config.QUALITY, macro_block_size=config.MACRO_BLOCK_SIZE)
Finally, we use these frames to render a 360-degree video of the object (Lines 115-121).
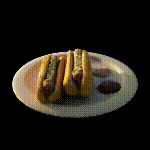
Let’s have a look at the fruits of our hard work, shall we? The 360-degree video of the rendered hot dog object is shown in Figure 6.
What's next? We recommend PyImageSearch University.
86+ total classes • 115+ hours hours of on-demand code walkthrough videos • Last updated: April 2026
★★★★★ 4.84 (128 Ratings) • 16,000+ Students Enrolled
I strongly believe that if you had the right teacher you could master computer vision and deep learning.
Do you think learning computer vision and deep learning has to be time-consuming, overwhelming, and complicated? Or has to involve complex mathematics and equations? Or requires a degree in computer science?
That’s not the case.
All you need to master computer vision and deep learning is for someone to explain things to you in simple, intuitive terms. And that’s exactly what I do. My mission is to change education and how complex Artificial Intelligence topics are taught.
If you're serious about learning computer vision, your next stop should be PyImageSearch University, the most comprehensive computer vision, deep learning, and OpenCV course online today. Here you’ll learn how to successfully and confidently apply computer vision to your work, research, and projects. Join me in computer vision mastery.
Inside PyImageSearch University you'll find:
- ✓ 86+ courses on essential computer vision, deep learning, and OpenCV topics
- ✓ 86 Certificates of Completion
- ✓ 115+ hours hours of on-demand video
- ✓ Brand new courses released regularly, ensuring you can keep up with state-of-the-art techniques
- ✓ Pre-configured Jupyter Notebooks in Google Colab
- ✓ Run all code examples in your web browser — works on Windows, macOS, and Linux (no dev environment configuration required!)
- ✓ Access to centralized code repos for all 540+ tutorials on PyImageSearch
- ✓ Easy one-click downloads for code, datasets, pre-trained models, etc.
- ✓ Access on mobile, laptop, desktop, etc.
Summary
In this tutorial, we have successfully implemented a training and inference script that is scalable and compact.
In the final stage of the tutorial, we have synthesized novel views from sparse static images and rendered a video out of them.
NeRF is an example of groundbreaking research in both Deep Learning and Computer Graphics. It advances the field a great deal by achieving results that very few methods have been able to do thus far. Numerous variants and improvements will also succeed in the coming years.
Tell us which of these variants you would like us to cover next?
Tweet us @PyImageSearch
We hope you enjoyed this 3-part tutorial, and as always, you can download the source code and try it for yourself.
Citation Information
Gosthipaty, A. R., and Raha, R. “Computer Graphics and Deep Learning with NeRF using TensorFlow and Keras: Part 3,” PyImageSearch, 2021, https://pyimagesearch.com/2021/11/24/computer-graphics-and-deep-learning-with-nerf-using-tensorflow-and-keras-part-3/
@article{Gosthipaty_Raha_2021_pt3,
  author = {Aritra Roy Gosthipaty and Ritwik Raha},
  title = {Computer Graphics and Deep Learning with {NeRF} using {TensorFlow} and {Keras}: Part 3},
  journal = {PyImageSearch},
  year = {2021},
  note = {https://pyimagesearch.com/2021/11/24/computer-graphics-and-deep-learning-with-nerf-using-tensorflow-and-keras-part-3/},
}
To download the source code to this post (and be notified when future tutorials are published here on PyImageSearch), simply enter your email address in the form below!

Download the Source Code and FREE 17-page Resource Guide
Enter your email address below to get a .zip of the code and a FREE 17-page Resource Guide on Computer Vision, OpenCV, and Deep Learning. Inside you'll find my hand-picked tutorials, books, courses, and libraries to help you master CV and DL!

Comment section
Hey, Adrian Rosebrock here, author and creator of PyImageSearch. While I love hearing from readers, a couple years ago I made the tough decision to no longer offer 1:1 help over blog post comments.
At the time I was receiving 200+ emails per day and another 100+ blog post comments. I simply did not have the time to moderate and respond to them all, and the sheer volume of requests was taking a toll on me.
Instead, my goal is to do the most good for the computer vision, deep learning, and OpenCV community at large by focusing my time on authoring high-quality blog posts, tutorials, and books/courses.
If you need help learning computer vision and deep learning, I suggest you refer to my full catalog of books and courses — they have helped tens of thousands of developers, students, and researchers just like yourself learn Computer Vision, Deep Learning, and OpenCV.
Click here to browse my full catalog.